Ingredients:
Olive Oil
Can of Beer
4 to 4.5 pounds of Whole Chicken
Dry Rub
Step 1: Get yourself a can of beer. There are those out there who use an empty vegetable can and fill it with chicken stock, or those who use a can of soda. All these options are fine, but for me, since its called Beer Can Chicken, I like to use a can of beer.
FAQ #1: Can I use a bottle of beer instead? NO!!! If you can't envision the reasons why, then maybe you should stick to hamburgers and hot dogs on the grill.
Step 2: Make sure you clean the can and put it in the refrigerator before you begin
Step 3: Take your chicken and remove any excess fat or skin
Step 4: Thoroughly wash out the chicken under running water
Step 5: Dry the chicken well with paper towels
Step 6: Place the chicken in a disposable 9x13 pan
... and fill up one chimney with charcoal and light it.
Gas Grills: For three burner gas grills, go outside and light the two outside burners on high and leave the middle one off and close the top so the grill gets hot.
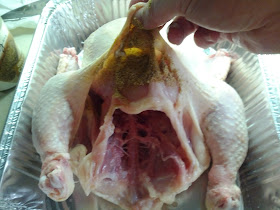
Step 7: Using your fingers, stretch the skin on the top at the breasts....
... and on the bottom by the thighs being careful not to rip or tear the skin
Step 8: Take your can of beer out of the fridge and pour half of it out into a cup.
FAQ #2: Can I just leave the can closed? Sure, but I recommend you get the wife and kids out of the house before your chicken explodes inside your grill.
There are many different reasons out there why you use a cold can of beer instead of a warm one. They vary from the extra condensation on the can when it goes on the grill helps keep the chicken moist to you delay the steam from the can and given the chicken skin enough time to crisp. For me, I just don't like drinking warm beer.
Step 9: Using a sharp knife, carefully make 2 additional holes at the top of the can
Step 10: Take your dry rub and begin to rub it under the skin by the breasts and the thighs
Step 11: Pour olive oil on top of the chicken...
.... and rub it all over the chicken on both sides
Step 12: Take your rub and begin to rub it all over the outside of the chicken
Step 13: Make a small incision on the side of the chicken to tuck the wings in.
Step 14: Take some of your rub and add it to the can of beer. I recommend highly to do this in the sink because when the salt in your rub reacts with the beer, it will bubble over out of the can.
Step 15: Rub olive oil around the outside of the can. This will help make the can release after it is done cooking.
Step 16: Take the can and insert it from the bottom into the cavity of the chicken and position it until it can sit upright
Step 17: Once the charcoal is hot and is beginning to turn white, place a disposable pan on the charcoal grate and pour the charcoal on the sides of the pan. This is a good time to add some pre-soaked wood chips on both piles of charcoal to add a smokey flavor to the chicken.
Step 18: Place the grate back on the grill and place the chicken in the middle of the grill over the pan.
At this point if you want to add any additional chicken to grill, just make sure you leave it in the middle of the grill over the pan.
Gas Grills: Place the chicken over the middle burner that is off and close the top. Cook the chicken for 20 minutes with the burners on high to help crisp up the outside and then lower the burners to medium low.
Step 19: Cover the grill and DO NOT TOUCH IT!!! Just look longingly at the grill from inside the house as you wait for it to be done. The chicken is cooking using indirect heat and every time you open the cover, you are releasing all the internal heat.
Step 20: Cooking times will vary depending on how big your chicken is, the internal temperature of the grill, and the temperature outside. You want to make sure that you cook the chicken until the juices run clear or until the internal temperature reaches between 165-175 degrees.
Step 21: There are a few different ways to remove the can from the chicken. One way is to take a BBQ fork and pierce the can while lifting it with tongs off of the can. For me, since I cook this chicken for a long time on a lower temperature, it usually breaks off around the can once it is lifted off the grill.


No comments:
Post a Comment